How to create a label in Jira cloud
Jira is a powerful tool used by teams worldwide to manage projects, track issues, and collaborate more effectively.
One of the very useful features in Jira is the ability to use labels. Labels are a simple yet effective way to categorize and filter issues. However, if you’re new to Jira Cloud, you might be searching for a “Create Label” button or an option in the settings—only to come up empty-handed. The truth is, labels in Jira work a bit differently than you might expect.
Understanding Labels in Jira
Unlike other tools where you might have a dedicated space to create and manage labels, Jira simplifies the process.
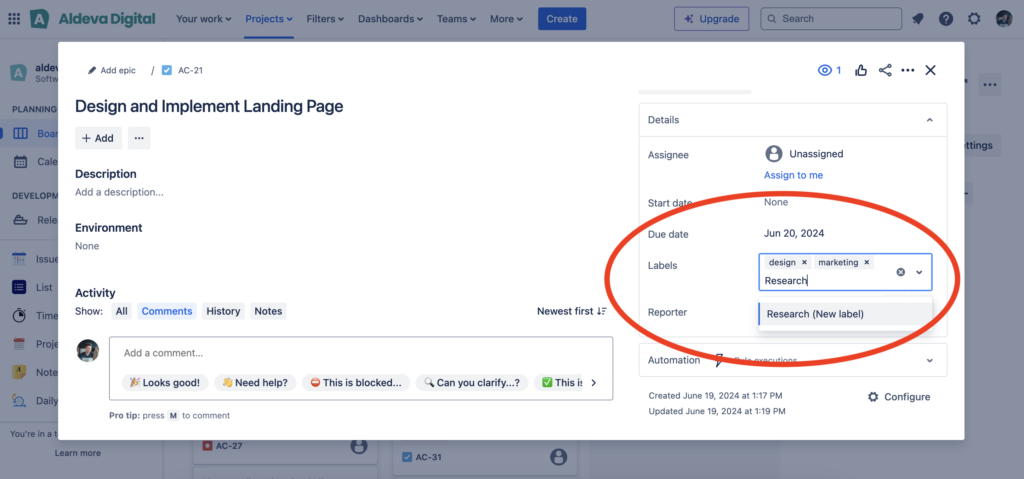
In Jira Cloud, labels are created automatically as soon as you add one to an issue. There’s no need to go through a special process to create a label beforehand.
How to Add (or Create) a Label in Jira
- Open an Issue: Navigate to the issue where you want to add a label. This can be a task, bug, story, or any other issue type.
- Locate the Labels Field: On the issue page, find the “Labels” field. This is usually found in the right-hand panel or in the main body of the issue details, depending on your Jira configuration.
- Add a Label: Click on the “Labels” field. If you want to use an existing label, start typing, and Jira will suggest labels that match your input. If you want to create a new label, simply type the new label name and press enter.
- That’s it!

Conclusion
While Jira doesn’t have a dedicated “Create Label” button, the process of adding labels to issues is straightforward and intuitive. By simply typing the desired label into the “Labels” field, you create it instantly and can start using it across your projects. This method keeps Jira flexible and responsive, allowing your team to adapt and organize work as needed.
